
You can now order some of your favorite drinks at

Jump to:
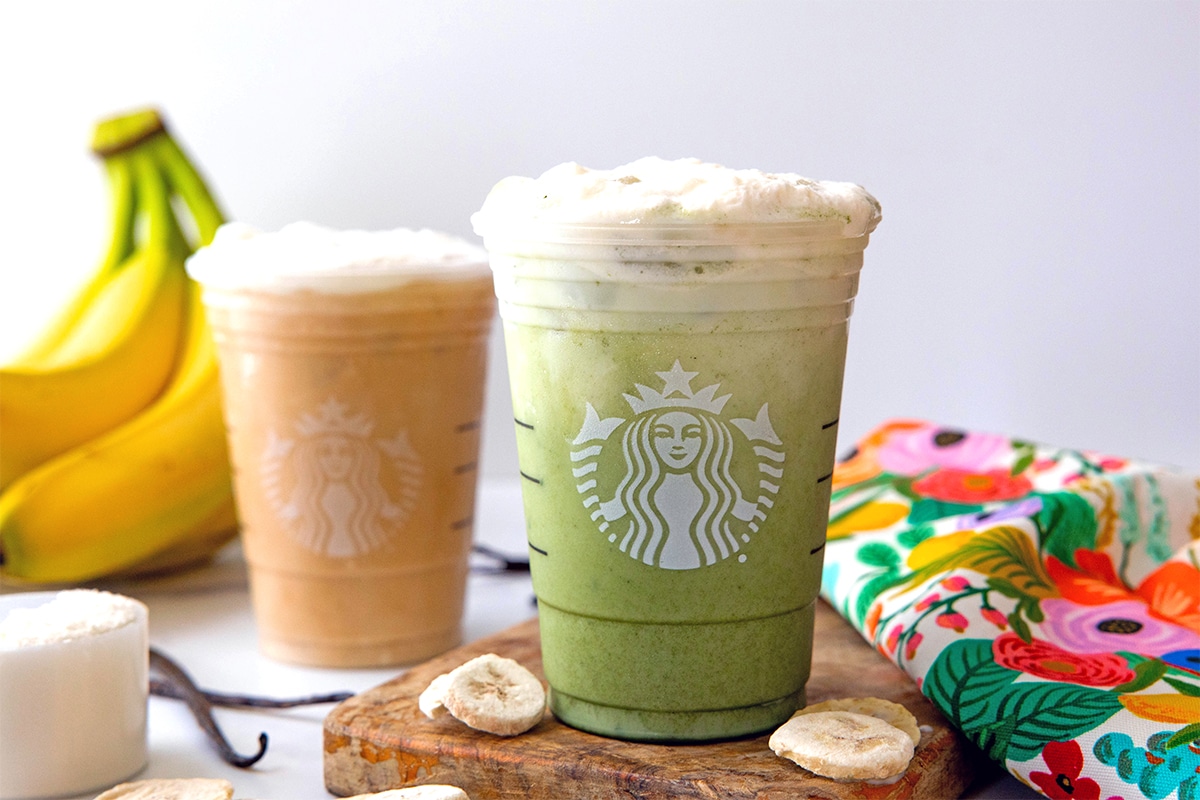
Starbucks has finally reintroduced protein back in to their menu lineup... This time in the form of lattes and cold foam!
There's nothing complicated about these new drinks, but they do pack a protein punch. Each grande drink contains about 26 grams of protein, which is great for anyone who's always trying to get more into their diet.
This guide gives you the copycat recipe for the protein milk base, and cold foam making process, so you can make any flavor protein drink at home.
💪 What are Starbucks protein drinks?
Starbucks' new protein drinks are their typical iced and hot lattes, but made with 2% milk that's been blended with unflavored protein powder and optionally topped with protein cold foam or froth.
Because the protein is in the milk, you can technically add protein to any milk-based latte or drink you order. And enjoy so many different protein cold foam flavors!
Unfortunately, the protein only comes in 2% milk, so there isn't a dairy-free option at this time. But, you can make it dairy-free when you make your own at home. The steps for this are a little different, so please be sure to view the notes on it.
🥛 How to make Starbucks protein milk at home
Once you have the protein milk, you can make any of
All you have to do is mix unflavored whey protein isolate with 2% milk.
When looking for a whey protein isolate powder, try to find one that also contains lecithin (sunflower or soy), but make sure it doesn't contain gums, creamers, sweeteners, or maltodextrin.
The lecithin helps the powder dissolve quickly in milk so your drink has the consistency of a latte, not a gym shake.
This is the whey protein isolate powder I use.

I like to make 3 cups of protein milk at a time, which is enough to make 2 grande sized lattes with both milk added to them and cold foam topping.
Here's what you need for the batch:
- 3 cups 2% milk (see next section if you want to use a dairy-free alternative)
- 7 tablespoon whey protein isolate (roughly 35 grams)
You have a few options for blending your protein milk:
- Immersion blender: add milk and whey protein isolate to a tall pitcher or jar and use an immersion blender for about 15 seconds, until the mixture is glossy and smooth. This is my preferred method as it's quick and easy.

- Countertop blender: add milk and whey protein isolate to your countertop blender and blend on low-medium power for 10-15, seconds until smooth.
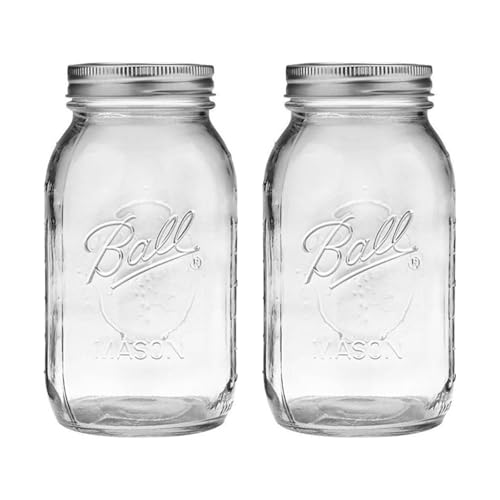
- Mason jar: for maximum simplicity, add ¾ cup milk followed and 7 tablespoon whey protein isolate to a large mason jar, and shake vigorously for about 60 seconds. Let rest for for 60 seconds and then shake for another 30 seconds. Add remaining 2 ¼ cup milk and shake to combine. I recommend using a shaker ball (or 2-3 clean marbles) to help blending. If you're having trouble getting your powder to dissolve fully, you can heat about ½ cup of the milk to lukewarm and dissolve the powder in it before adding the rest of the cold milk.

Milk can be used right away, but for best results, I recommend chilling it in the fridge for about 30 minutes before using.
You can keep this protein milk in an airtight container in your fridge for about 4 days. Or by the milk's "use by" date, whichever is sooner.
When you're ready to use it, you'll want to be sure to give it a good shake.
📧 Email Me This Recipe
🥣 How to make dairy-free protein milk
Though you can absolutely make this protein milk with alternative milks, like oat milk, soy milk, and almond milk, you need to make sure you're purchasing an isolate powder that doesn't contain whey (which is dairy) and instead look for a soy protein isolate (or pea protein isolate).
Also, the protein isolate won't blend quite as well as it does in dairy milk. This is generally due to the fact that dairy-free milks often have added oils and gums added to them.
To minimize issues, be sure not to purchase barista-style dairy-free milks (this is the opposite of the advice I usually give when making
I recommend hydrating the powder first to prevent clumping.
To do this, mix together ¾ cup of the dairy alternative with your soy or pea protein isolate initially (use about a scoop of the isolate or however much equals about 25 grams of protein). Blend or whisk the mixture until smooth and then let rest for 60-90 seconds. Add the remaining 2 ¼ cups milk and blend again. Chill for 30 minutes before using.
If your milk seems clumpy, you can pre-slurry the powder with ¼ cup warm water (95-110 degrees) before whisking it into the milk. A little pinch of sunflower lecithin can also help dispersion.
☁️ How to turn milk into cold foam
If you've ever used my Starbucks cold foam recipe to make your own, this is the same exact one. Except you use the protein milk instead of plain 2% milk.
You can add any flavor of syrup or powder to your mixture to flavor the cold foam how you want.
Here's what you need:
- ¾ cup protein milk
- ¼ cup heavy cream
- 2 tablespoon flavored syrup or 1 teaspoon flavored powder
You simply need to put the protein milk, heavy cream, and syrup and/or powder in a mason jar and shake to combine.
If you don't have a jar, you can can stir all ingredients together in a bowl.
If you're not making the cold foam right away, you can keep this jar of protein sweet cream in an airtight container in the fridge.

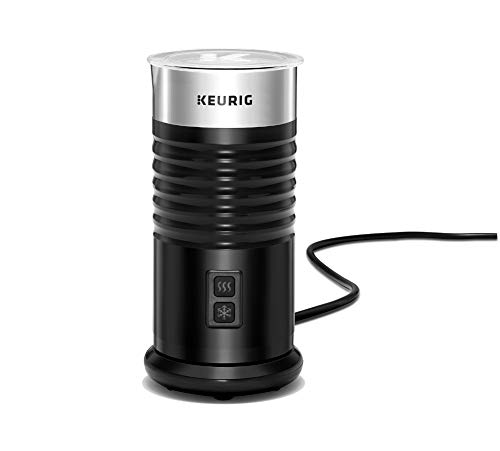
When you're ready to make the sweet cream into a protein cold foam, you can either use an electric frother, hand mixer, or blender.
Just add the protein sweet cream and froth, mix, or blend until the mixture turns into a foam.

If you don't have any of these devices, keep the mixture in the mason jar and shake vigorously until it's frothy.
Use the protein cold foam on top of any iced drinks you want. I'll be sharing recipes for a few of the specific

And the Iced Banana Cream Protein Matcha. This one has banana powder mixed into the cold foam.
You can also use the cold foam in this Iced Banana Bread Matcha drink.

I'm excited to see how the new
📖 Recipe

Starbucks Protein Lattes
📧 Email Me This Recipe
Ingredients
Protein Milk
- 3 cups 2% milk (see notes for dairy-free version)
- 7 Tbsp (~35 grams) whey protein isolate (with sunflower or soy lecithin)
Protein Cold Foam
- ¾ cup protein milk (from recipe above)
- ½ cup heavy cream
- 2 tablespoon flavored syrup of choice OR 1 teaspoon flavored powder of choice
Instructions
Protein Milk
- You have 3 options for mixing your protein milk:1) Immersion blender: Add milk and whey protein isolate to a tall pitcher or jar and use an immersion blender for about 15 seconds, until the mixture is glossy and smooth.
- 2) Countertop blender: add milk and whey protein isolate to your countertop blender and blend on low-medium power for 10-15, seconds until smooth.
- 3) Mason jar: for maximum simplicity, add ¾ cup milk and 7 tablespoon powder to a large mason jar (with shaker ball or clean marbles if possible), and shake vigorously for about 60 seconds. Let rest for for 60 seconds and then shake for another 30 seconds. Add remaining 2 ¼ cup milk and shake to combine. If you're having trouble getting your powder to dissolve fully, you can heat about ½ cup of the milk to lukewarm and dissolve the powder in it before adding the rest of the cold milk.
- For best results, let protein milk rest in fridge for about 30 minutes before using. Store protein milk in mason jar or other airtight container in the fridge for up to 4 days. Be sure to shake well before using.
Protein Cold Foam
- Mix milk, cream, and syrup or powder of choice in a mason jar and shake to combine. Alternatively, you can stir all ingredients together in a bowl. If you're not using right away, keep in an airtight container in the fridge. You can use this protein sweet cream in coffee as is if you want.
- Turn mixture into cold foam right before using. You can either use an electric frother, hand mixer, or blender. Just add the protein sweet cream and froth, mix, or blend until the mixture turns into a foam. Alternatively, you can shake the mixture in a mason jar until it's frothy.
Notes
- You can use the non-dairy alternative of your choice in your protein milk, but you need to make sure you're purchasing an isolate powder that doesn't contain whey (which is dairy) and instead look for a soy protein isolate (or pea protein isolate) to keep milk dairy-free. Protein isolate powder won't blend quite as well as it does in dairy milk. To minimize clumps, be sure not to purchase barista blends of milk and follow this hydrating process:
- Mix together ¾ cup of the dairy alternative with your soy or pea protein isolate initially (use about a scoop of the isolate or however much equals about 25 grams of protein). Blend or whisk the mixture until smooth and then let rest for 60-90 seconds. Add the remaining 2 ¼ cups milk and blend again. Chill for 30 minutes before using.
- If your milk seems clumpy, you can pre-slurry the powder with ¼ cup warm water (95-110 degrees) before whisking it into the milk. A little pinch of sunflower lecithin can also help dispersion.


Comments
No Comments